AQL Calculator
| Quantity: | Inspection Level: | Sample Size: |
| CRITICAL DEFECTS | MAJOR DEFECTS | MINOR DEFECTS |
| Select AQL: | Select AQL: | Select AQL: |
| Select AQL: | Select AQL: | Select AQL: |
| Accept Point: 0 | Accept Point: 0 | Accept Point: 0 |
| Reject Point: 0 | Reject Point: 0 | Reject Point: 0 |
In quality control, the third-party inspection agencies normally use product random inspection to ensure that the products of a given shipment meet the required standards. AQL (Acceptable Quality Limit) Sampling is a method widely used to define the maximum acceptable number of defective items in a sample size, before rejecting the entire batch.
GIS Inspection follows the ISO 2859 standard and the AQL sampling provided by it. To evaluate the overall production lot quality, GIS inspectors will verify sampling products on their functional, visual, and material properties.
The GIS inspection report will clearly state whether your production has passed or failed your selected Acceptable Quality Limit level.
What is AQL Acceptable Quality Limit?
AQL stands for Acceptable Quality Limit, is defined as the “quality level that is the worst tolerable” in ISO 2859-1. It is the quality level that is the worst tolerable process average when a continuing series of lots is submitted for acceptance sampling. The AQL is a parameter of the sampling scheme. It is expected that the product quality lever will less than the AQL.
AQL stands for an acceptance quality limit that:
- Indicates the number of samples that should be selected from the total quantity of your order during inspection
- Determines the maximum number of defects allowed in a batch of goods.
It can be considered as the maximum limit of defects for a certain number of products in the order.
There are normally three AQL specified for critical, major and minor defects separately. A typical set of AQL would be as follows:
| Inspection Level | General Level Ⅱ | ||
| Defect | Critical | Major | Minor |
| AQL0 | 0 | 1.5 | 4.0 |
The smaller the number, the fewer defects will be accepted in the sample of product. When choosing AQLs, it is important that one understands the balance between setting them too low, and rejecting many shipments, and setting them too high and releasing unacceptable product.
AQL Defects
Usually in Production and Quality Control defects are classified in three types: Critical, Major and Minor.
- Critical - A critical defect is on that judgment and experience indicate is likely to:a. result in hazardous or unsafe conditions for individuals using, maintaining, or depending upon the products; b. prevent performance of the tactical function of a major end item.
- Major - A major defect is one, other than critical, that is likely to result in failure, or to reduce materially the usability of the unit of product for its intended purpose.
- Minor - A minor defect is one that is not likely to reduce materially the usability of the unit of product for its intended purpose, or is a departure from established standards having little bearing on the effective use or operation of the unit of product.
What are the Benefits of AQL Quality Control Inspections?
When you are planning to conduct quality control inspection of the products you import from Asia, choosing 100% inspection or random sampling inspection?
Sometimes it’s desirable to inspect an entire order of goods. But in most cases, you’ll benefit more by having inspection staff pull a random sample of units from the total order to check using AQL and random sampling.
Benefits of AQL and Random Sampling in Quality Inspections:
- Time Efficiency: By inspecting only a subset of the lot/shipment, inspections are faster compared to 100% inspection.
- Cost Reduction: Reduces labor and operational costs due to a lighter workload and minimizes product wastage during destructive testing (e.g., fabric weight or welding strength).
- Clear Acceptance and Rejection Criteria: Provides precise, standardized inspection outcomes, ensuring objectivity and consistency.
- Customization Inspection Focus: Allows flexibility to apply different AQL levels for various inspection aspects.
The AQL is a main tool for assessing batch quality without full inspection. Inspectors use it during product checks, and importers rely on it to decide batch acceptance. Random sampling before shipping helps quickly spot and address defects.
How to Choosing the Right Sample Size and AQL?
AQL Calculator
| Quantity: | Inspection Level: | Sample Size: |
| CRITICAL DEFECTS | MAJOR DEFECTS | MINOR DEFECTS |
| Select AQL: | Select AQL: | Select AQL: |
| Select AQL: | Select AQL: | Select AQL: |
| Accept Point: 0 | Accept Point: 0 | Accept Point: 0 |
| Reject Point: 0 | Reject Point: 0 | Reject Point: 0 |
The steps to follow while selecting a sampling plan include:
- Decide AQL and choice of sampling plan.
- Based on lot size, choose sample size code letter.
- Based on sample size code and AQL, choose sample size and accept/reject numbers.
Product quality is assessed and accepted worldwide based on the AQL standard. AQL indicates the maximum acceptable defects for a certain sample size of products inspected.
AQL standards are used as a reference during a pre-shipment inspection. And widely used settings for consumer goods in Asia:
GIS’s default limit is critical. 0, Major. 2.5, Minor. 4.0, which means that the limit of Critical defects is 0, Major defects are 2.5, and Minor defects are 4. These limits indicate the maximum number of product defects in the sample size for acceptance of the order.
You can establish your own acceptance limits based on your acceptable quality. For high-value products sometimes critical. 0, Major. 1.5, Minor. 4.0, is used, or even Major. 1.0, Minor. 2.5.
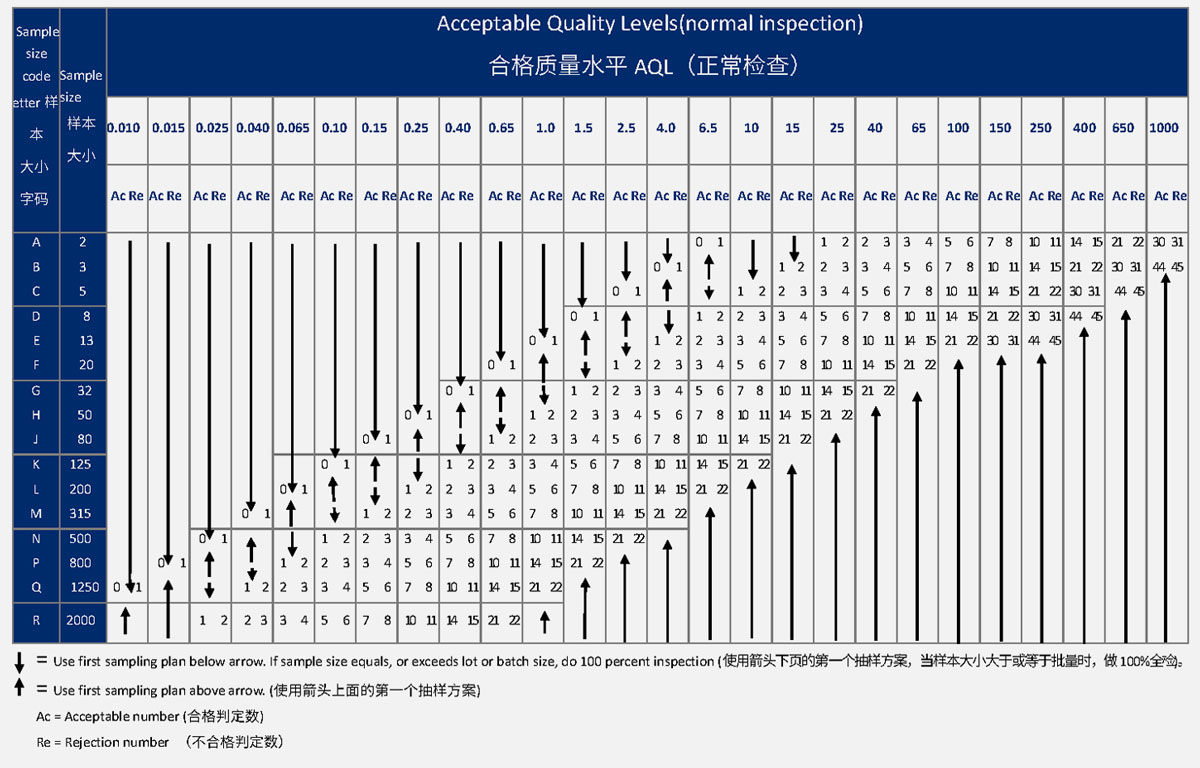
To determine the number of acceptable defects in production, find within the tables the sample size and then the quality limit - the acceptable (Ac) and rejected (Re) number of defects will be indicated at the intersection.
How to Read the AQL Table?
The AQL chart consists of two Acceptable Quality Limit tables and used to determine the sample size for inspection and the acceptable defective units. The first one tells you which ‘code letter’ to use. Then, the code letter will give you the sample size and the maximum number of defects that can be accepted.
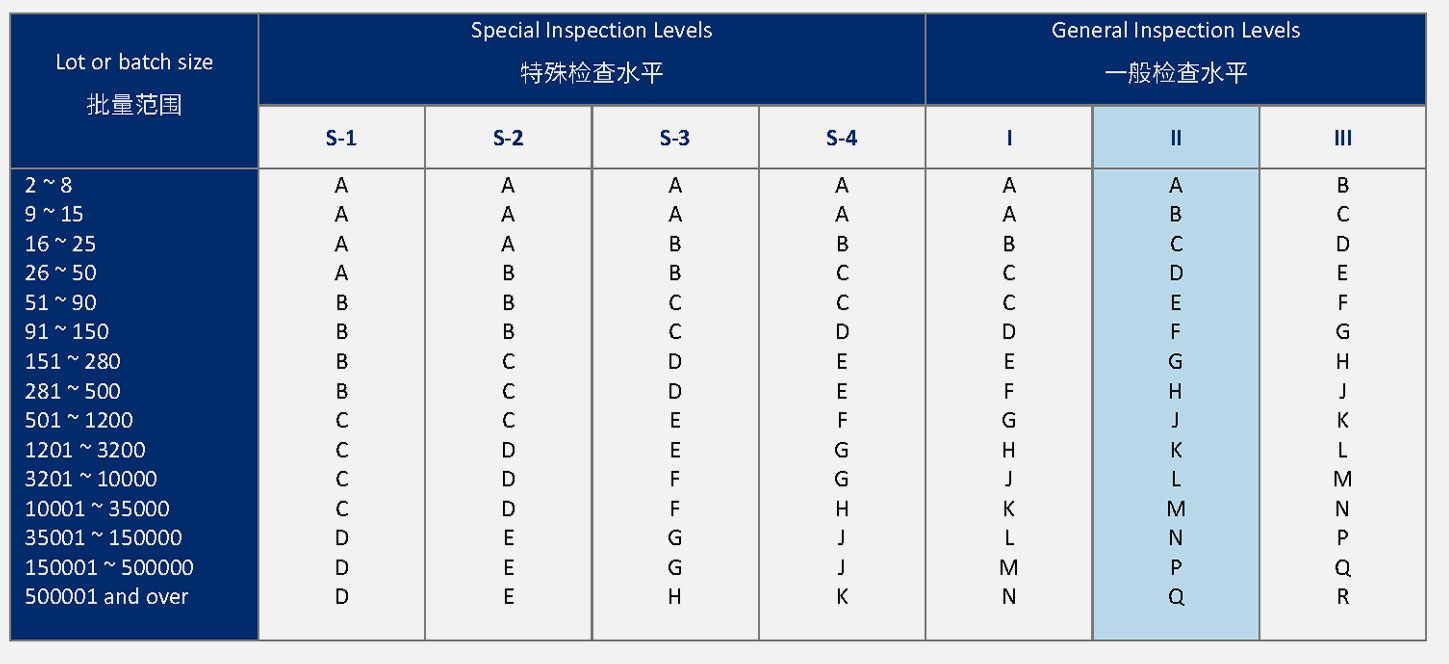
First table: sample size code letters
The first table on the AQL chart is Sample Size Code Letters, which is divided into three columns for lot or batch size, special inspection levels, and general inspection level. The special inspection levels column is reserved for particular types of product testing. The lot or batch size column represents the number of units in your order.
If your order is 5000 units, it will fall between 3,201 pcs and 10,000 pcs, and that your inspection level is ‘II’. Consequently, the code letter is “L”. Once you attain “L” as your sample size code letter, you can proceed to the second table on the AQL chart.
Note: Even though the general inspection levels consist of level I, II, and III, the best practice is to use level II (GII).
Second table: single sampling plans for level II inspection (normal severity)
The second table on the AQL chart has three columns for sample size code letter, sample size, and acceptable quantity levels. The code letter is “L”, so you will have to draw 200 pcs randomly from the total lot size. Besides, we assume you have set your AQL at 2.5% for major defects and 4.0% for minor defects.
Therefore, here are the limits: the products are accepted if NO MORE than 10 products with major defects AND NO MORE than 14 products with minor defects are found. For example, if you find 15 products with major defects and 12 products with minor defects, the products are refused. If you find 3 with major defects and 7 with minor defects, they are accepted.


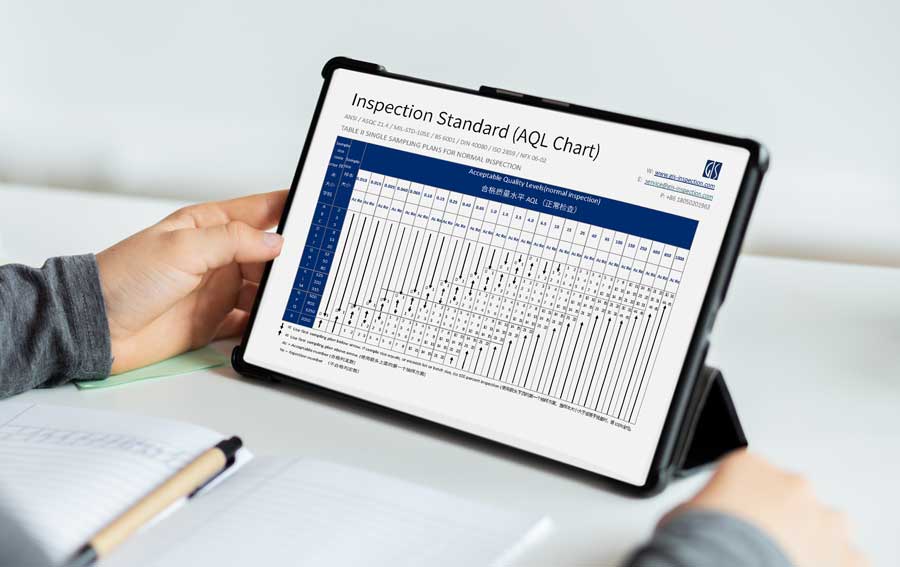
Are you performing random quality inspections? Use the free AQL chart from GIS Inspection to quickly find your sample size.
How does Sampling Work During an Inspection by GIS?
GIS recommends utilizing ANSI Z1.4 2008/ ANSI/ ASQC Z1.4/ BS6001/ DIN 40080/ISO 2859/ NFX 06-022(the same inspection sampling standard showed in ANSI and AQL) for inspection sampling.
This standard and its equivalence are designed according to the statistics theory and are indexed with AQL(see next section) . The sampling plans in these standards indicates the number of units of products from each lot or batch which are to be inspected (sample size) and the criteria foe determination of the acceptability of the lot or batch.
Generally, inspection levelⅡshall be used, otherwise a particular lever which determines the relation between the sample size and the lot or batch size will be prescribed by the responsible authority.
Based on the lot or batch size and the inspection level code letters are assigned that cross-reference to the sample size required depending on which plan is being employed. Single and double normal sampling plans are the most commonly used.
If you do not have existing sampling requirements, GIS will assist you in determining which plan works best for your specific needs. Samples are checked against a detailed inspection plan for appearance, applicable functionality, packaging integrity, workmanship, etc.
If you currently do not have any inspection plan, GIS can assist you. Defects found are classified as critical, major or minor depending on the inspection plans. The acceptable quality limit (AQL) is specified by the responsible authority with the types of defects.
A typical set of AQL is described in the section of “What is AQL”. Acceptability of the lot or batch is determined by the corresponding accept/reject criteria with the sampling plan.
However, it should be born in mind that this standard is intended to be used on a continuous series of lots, when used without the switching rules, the operating characteristics of the sampling plan must be assessed individually.
Conclusion
Professionals in the quality control field have been using AQL as the basis for acceptance sampling for decades.
Based on your product, budget, appetite for risk and other factors, You will ultimately make the decision about how many units to check. But a professional QC company like GIS Inspection can often recommend what they feel is an appropriate inspection method.
GIS Inspection is a third-party quality assurance agency. We provides comprehensive quality control inspection and factory audit designed to protect you supply chain safety. We have set up an inspection network covering China, Vietnam, India and Malaysia.
GIS Inspection assists both in guiding you toward the right level for your production and also with the random sampling inspections. Talk to the experts with questions, or to discuss your specific quality requirements.
FAQs
Q1: What is the inspection level?
The inspection level designates the relative amount of inspection. Three inspection levels, Ⅰ, II, and Ⅲ, are given in Table 1 for general use. Unless otherwise specified, level Ⅱshall be used. levelⅠmay be used when less discrimination is needed or level Ill when greater discrimination is required.
Four additional special levels, S-1, S-2, S-3 and S-4 are also given in Table 1 and may be used where relatively small sample sizes are necessary and larger sampling risks can be tolerated.
Q2: What is the AQL limits?
Quality level that is the worst tolerable process average when a continuing series of lots is submitted for acceptance sampling. The AQL limits appropriate for your market. If your customers accept very few defects, you might want to set a lower AQL for both major and minor defects.
Q3: How to choose an AQL limit for my products?
It depends on your distribution channel and your product’s end use. Note that your supplier might refuse AQL limits they estimate as too tight (i.e. too low).
Q4: What are typical limits for consumer electronics?
A small company that doesn’t have much money to invest in DFM and the NPI process, in general, will usually set the limits at 2.5 or 1.5 (for major defects) and 2.5 or 4.0 (for minor defects). This should be communicated from the start, as it may have a direct impact on cost.
A company that invests a million USD or more in developing a new product, and that works with a contract manufacturer to prepare for large production volumes, will usually set a limit on major defects at 0.6 or 1.0.
Q5: What to do with defective samples?
If a batch of goods has not passed the AQL inspection, you can still accept it if you want to, even if the inspection report indicates that your products “Failed”.
You can ask your manufacturer or supplier representative to sort, repair, or replace the defective products. It is also possible to purchase a defective product at a discount, referring to unsatisfactory quality or defects.
Q6: Can’t I just do my own sampling plan?
Sure. If you have a math background, you know that you’ll need to use a hypergeometric distribution (since samples are taken from the lot at random, are checked, and not put back into the lot until the end of the inspection). Specialized software like Minitab can help you a lot here.
If you want to avoid statistics altogether, your limits on the numbers of defects will not make much sense, but they might “feel” right intuitively and it might make you more comfortable… Just be aware of their shortcomings.


